Sack and Polythene Gardens
Bible Reference/Memory Verse 2 Corinthians 9: 6
“Remember this: Whoever sows sparingly will also reap sparingly, and whoever sows generously will also reap generously”
Let us help one another so that everyone reaps the benefit of this project. Share your knowledge with your neighbour.
These can be made in various sizes by doubling or tripling polythene or sack layers depending on the space available. To make a bigger sack garden, one can sew different sacks together horizontally at the edges. Plants can be planted in the top of the sack and on the sides of the sack. Good soil fertility can be ensured by mixing soil and compost. Drainage can be ensured by putting some stones in the bottom.

You will need:
- Stones (small to medium sized)
- Sacks and polythene
- Manure or organic compost mixed with top soil
- A round container (about 9-12 inches in diameter) with the top and bottom cut out
- A knife
- A shovel
- Seedlings ready for planting
- A watering can
Method
- Place the sack/polythene on an even ground and put a small layer of soil (about 4 inches) at its bottom
- Place the round container (with the bottom and top cut out) into the centre of the sack or polythene on top of the soil. If a smaller sack is being used then use a 9 inch diameter container. If a bigger container is being used, then use a larger container such as a 12 inch diameter one
- Fill the container with stones up to the brim. These are meant for drainage and water distribution into the sack or polythene
- Shovel the soil around the container filled with gravel. When the soil reaches the top of the container, lift the container up slowly, leaving the stones in the centre, to create more space for adding the gravel. Add more stones in the container and add more soil around the container
- Repeat the same process until the sack/polythene is full. The sack should have the centre comprised of gravel/stones only
- Plant crops in the sack. Four crops could be planted at the top and about eight crops on the side of a sack measuring 2 feet high. Water crops immediately after planting
- Cover the top of the sack with grass to retain water in the sack
- Repeat for further sacks but space them out to allow the sun light to reach the crops on the sides for healthy growth
- Always water the sack garden every morning before 9:00am and every evening after 5:00 pm. Pour water through the stones in each sack. Also pour water on the sides of each sack around the plants

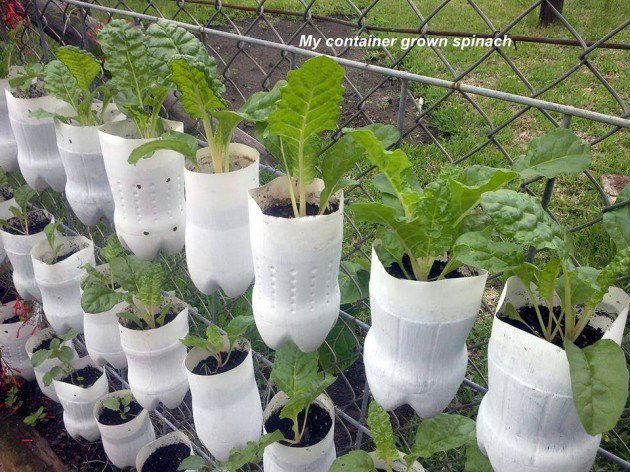
Container and Box Gardens
Various containers can support vegetable growth eg. Plastic bottles, buckets, wooden boxes, pots, jerry cans and woven baskets. They can be of various shapes and sizes depending on the space available.
You will need:
- A container that can support vegetable growth. This must be at least 25cm deep in soil to enable the root system to flourish
- Small to medium sized stones
- Manure or compost to mix with top soil
- A knife
- A shovel
- Wood (preferably flat), polythene sheet, a hammer and nails (for a wooden box)
- Seedlings for planting
- A watering can
Method
- Choose a sunlit area to place the container
- Place the container on an even ground
- Put a small layer of stones (about 3-5 inches) at its bottom. This is meant to improve drainage
- On top of the stones, add good soil that has been mixed with manure up to its brim
- Plant the desired seedlings in your container
- Water the crops well immediately after planting them
- Mulch the soil with grass to retain water in the container
- Space the containers well to be able to move around the garden and so that light can get to the plants for healthy growth
- When using plastic containers, such as buckets or jerry cans, some holes can be punched at the bottom prior to planting to improve drainage and prevent water logging
- When using wooden boxes, a polythene lining can be added before adding soil to maintain the moisture within the box and protecting the wood from rotting easily

Hanging Gardens
These are gardens that are suspended in the air and are not directly supported by the ground. A hanging garden enables the growing of vegetables in a limited floor space. Different containers eg. Baskets, bottles and buckets can be used
You will need:
- Pot or plastic bottles
- String or twine
- Drill or knife
- Top soil and manure/compost
- Seedlings
Method
- Begin with a small hanging pot, some potting soil, a hook or place to tie the hanging garden and seedlings. Annual vegetables are the best
- Drill the pot and thread string to hang, (or hang pot by hole directly onto hook). Make sure it is well fastened and secure
- Fill up the container with a mixture of soil and compost. This should not be clay like or too sandy
- Plant the seedlings and water them sufficiently
- Hang the garden in position
